
Earlier this year, I was assigned two work trips back to back in Las Vegas, Nevada and Salt Lake City Utah. I had a two-day break in between each one, and rather than flying home to Virginia to unpack/ repack, I decided to make the trek with some co-workers by car. What started as a tipsy rally for companionship became one of my highlights this year; The crew met me out in Vegas, we rented a Tahoe, road tripped to our luxury cabin in Brian Head, UT, and took two days sightseeing Zion and Bryce Canyon before landing in Salt Lake City.
I did some research prior to the trip and unfortunately, Pinterest didn’t have a lot about one day park experiences. I really only saw information about multi-destination road trips and extended stays in Zion. I therefore wish to document my footprint, in hope that I help someone looking for tips on how to spend a few hours in Zion.
First off, the trip was in July so while it was hot, hot, hot, Zion was the perfect park to conquer during the day. Unlike many other parks I’ve been to, there are frequent shaded areas, clean facilities, and waterways that are great for quick dips or full treks. (The Narrows.)
A Few Preliminary Notes:
- If you are travelling with a family or group, invest in an annual park pass that gives you access to more than 2,000 federal recreation sites. The pass is $80 and covers entrance/parking fees for an entire vehicle. A Zion week pass (valid for 7 consecutive days) is $35 per vehicle or $20 per person; We saved so much money using our friend’s annual pass- she is a Las Vegas local- and it was especially beneficial because we ventured through a few parks on our trip.
- Plan and pack accordingly. If you wish to venture into the Narrows, prepare to get wet. Ankle supported water shoes are recommended because the rocks below the current are not sturdy. Bring a reusable water bottle; hydration stations are located throughout the park. And bring snacks! There were 5 of us hiking and one of my co-workers had an brilliant idea of making sandwich squares using a Hawaiian Sweet Rolls 12-pack. It was amazing- we rewarded ourselves with a square after each hike conquered.
- Head to the park early! We arrived around 11AM and were surprised to find a line wrapped around the entrance. Although it moved quickly, it was a 45- minute wait under the summer sun.
- Get a map and speak with the park rangers at the visitor center (or look up trail conditions on the web) prior to hiking. We learned that some of the hikes were off limits due to rockfall and storm damage.
The park has a hop on, hop off bus that makes it extremely easy to cover a lot of terrain in one day. The shuttle system is the best way to learn about the park (the drivers are so entertaining and knowledgeable!) and get around quickly. Pick ups are every seven- ten minutes and work through a 9 stop system; All of the most popular trails are easily accessible from the stations.
We decided to forego the longer hikes to see more of the park, knowing that we only had about eight hours to explore. The trails we chose were easy/moderate but still had some incredible vantage points. Our line-up included the following:
- Lower Emerald Pool Trail
- Shuttle Stop to Start from: #5 Zion Lodge
- Distance (roundtrip): 1.2 mi / 1.9 km
- Elevation Change: 69 ft / 21 m
- Estimated Hiking Time: 1 hour
- Description: Minor drop-offs. Paved trail leads to the Lower Emerald Pool and waterfalls. Connects to the Kayenta and Upper Emerald Pools Trails. Swimming is prohibited in the Emerald Pools. Bathrooms and water filling stations are available at the Zion Lodge.
- Personal Notes: This was a beautiful hike and although the water flow was pretty light, I am glad we started here. The Upper Emerald Pool Trail was closed but I would definitely go back and try to see more, preferably in the rainy season when the waterfall is more powerful.

- Weeping Rock Trail
- Shuttle Stop to Start from: #7 Weeping Rock
- Distance (roundtrip): .4 mi / .6 km
- Elevation Change: 98 ft / 30 m
- Estimated Hiking Time: 30 minutes
- Description: Short but steep. Minor drop-offs. Paved trail ends at a few steps and a rock alcove with dripping springs. Trailside exhibits. Pit toilets are available at the parking area.
- Personal Notes: This was a quick hike but it tested our stamina with a steep trek. We were ready for lunch and a little dip at a nearby bridge after this one!

- Riverside Walk
- Shuttle Stop to Start from: #9 Temple of Sinawava
- Distance (roundtrip): 2.2 mi / 3.5 km
- Elevation Change: 57 ft / 17 m
- Estimated Hiking Time: 1.5 hours
- Description: Minor drop-offs. Paved trail follows the Virgin River along the bottom of a narrow canyon. Trailside exhibits. This trail is accessible however wheelchairs may need assistance. You must hike this trail to get to the bottom up Narrows route.
- Personal Notes: We wanted to see the Narrows so we hiked the Riverside Walk to the appropriate entrance. By this time it was 3PM and the “load in” area was PACKED- I would say that if you want to get good, unoccupied photos of the terrain then you have to commit to an early hike. We walked into the water and almost immediately, we heard thunder crackling in the distance. The current picked up as thick raindrops fell and it honestly looked like a stampede of people scrambling out of the water. I definitely want to return for a full hike but will think twice before making it a casual stop midday.

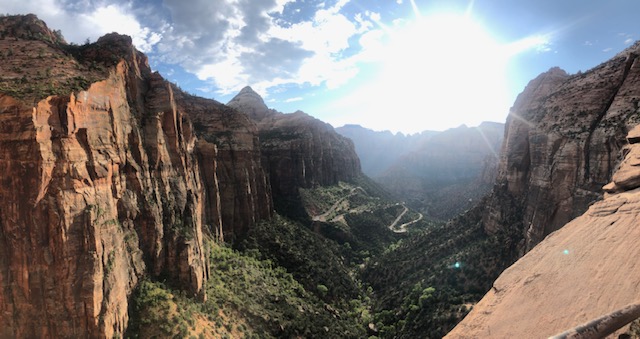
- Canyon Overlook Trail
- Shuttle Location: No shuttle, requires personal transportation.
- Distance (roundtrip): 1.0 mi / 1.6 km
- Elevation Change: 163 ft / 50 m
- Estimated Hiking Time: 1 hour
- Description: Long drop-offs, mostly fenced. Rocky and uneven trail ends at a viewpoint for Pine Creek Canyon and lower Zion Canyon. To enter or exit the parking area just east of the tunnel, you must turn right. Parking is extremely limited, be prepared to try multiple times. Pit toilets are available in the parking area.
- Personal Notes: We were leaving the park and decided to pull over and climb this last trail. One of my colleagues had tried it before it and it was my favorite, by far. It was the perfect overlook for a sunset and pretty quiet because it was off of the shuttle track.
We ended the day with an excellent meal at Zion Canyon Brewing Company, located at the base of the park. It was not very crowded, had great beers (we tried a flight and liked all of them), and had really interesting dishes with American pub burger/ sandwich staples and gamier options like buffalo meatloaf.
Although I cannot wait to go back to Zion and check out more of the park, the one-day expedition satisfied my wanderlust craving and should definitely be a stop on anyone’s road trip, even if only for a few hours. I hope to write another entry soon about the full Vegas- Salt Lake City trip, highlighting other stops along the way and tips that we picked up while researching. If you have ever been to Zion before and wish to add to these sights or if you have any questions for me, be sure to start a conversation in the comments below!


